Add REST API Data Source
This page explains the process of adding a REST API data source in the Pirivision Port module.
After the REST API connection is created, the data source can be used in the Compass module to send queries to HTTP endpoints. Queries prepared in Compass are then transformed into chart / KPI formats in Cartography and used in Horizon or Atlas dashboards.
Prerequisite
Before adding a REST API data source, the following should be ready:
- A reachable Base URL (e.g.
https://api.example.com/v1) - Authentication type and credentials (None, Basic, Bearer Token, API Key)
- Global Headers values, if needed
Information Needed Before Adding
| Information | Description | Default | Example |
|---|---|---|---|
| Name | Display name given to the data source inside Pirivision | — | REST-API |
| Description | Purpose of the data source | — | REST-API for Example |
| Base URL | Common base address for all requests | — | https://pirivision.digitheta.dev |
| Timeout | Request timeout (ms) | 5000 |
10000 |
| Retries | Number of retries for failed requests | 3 |
5 |
| Proxy | Proxy server address (optional) | — | https://proxy.example.com:8080 |
| SSL Verify | Verify the SSL certificate | OFF |
ON, OFF |
Base URL
The Base URL is the foundation of all Compass queries. Specific paths (e.g. /api/v1/products) are added when defining the query in Compass.
1. Open the Port Module
Click Port in the left menu. Port is the module where data sources are added, listed, edited, and tested in Pirivision.
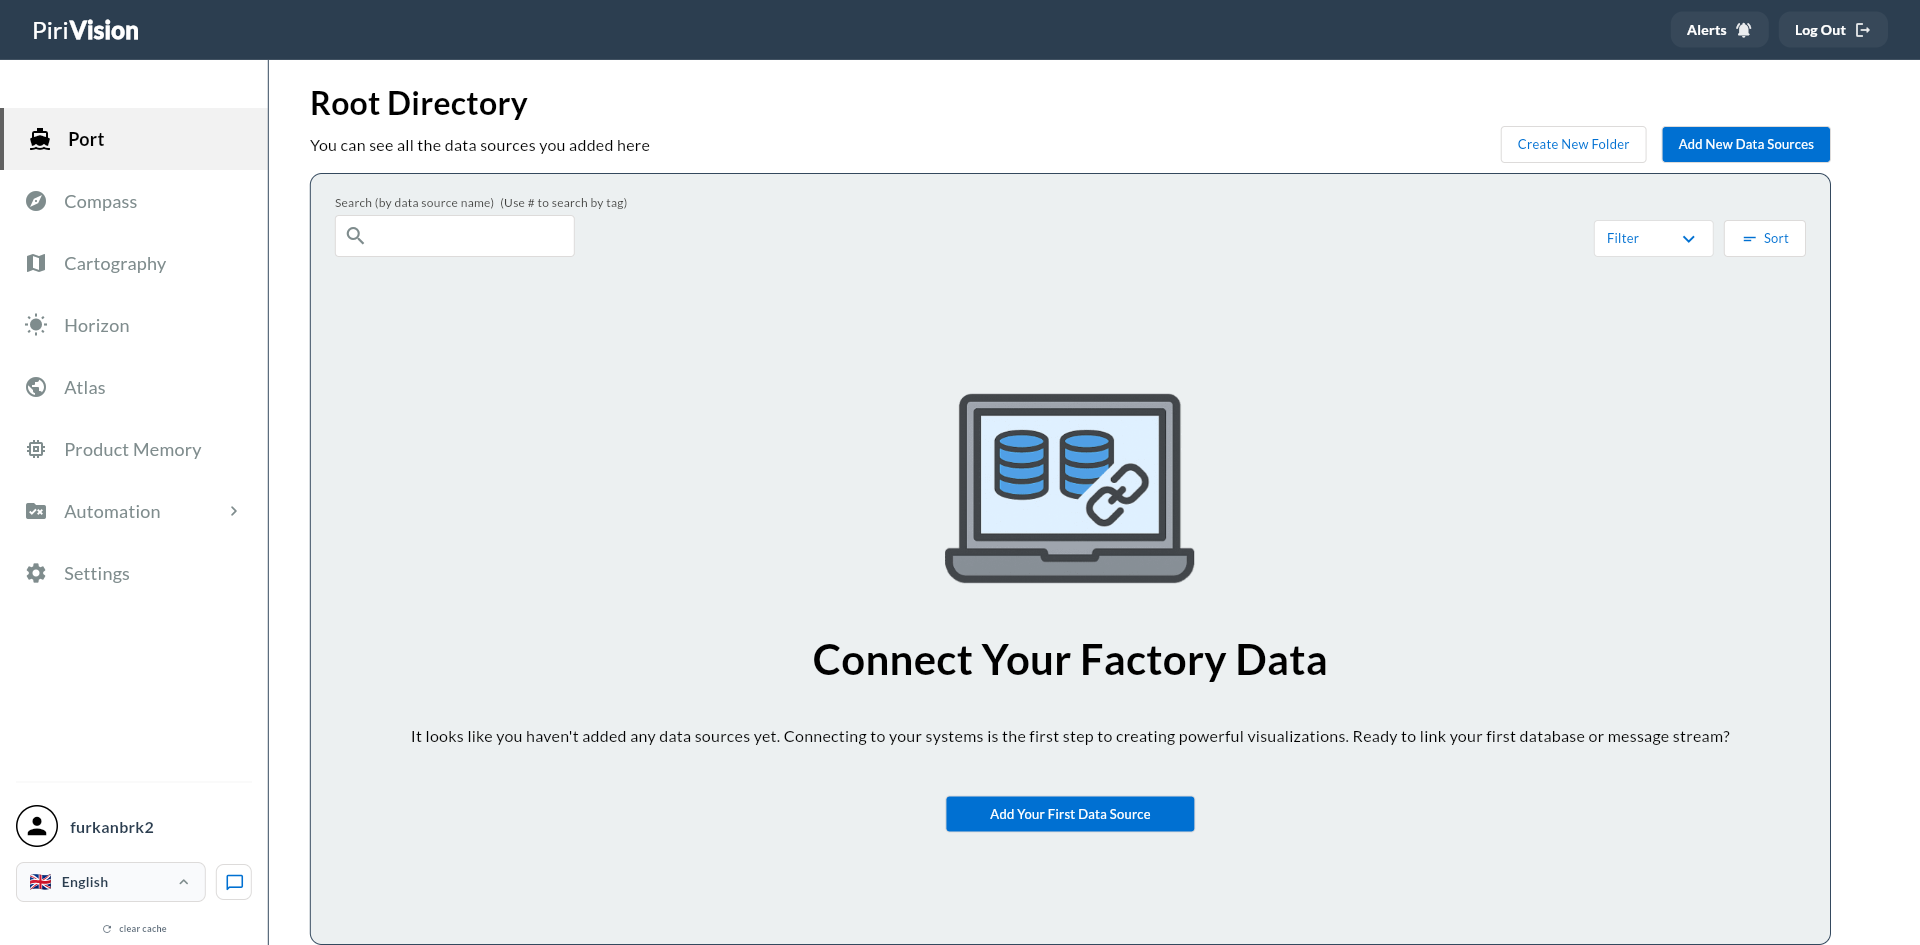
If no data source has been added before, the screen shows a Connect Your Factory Data message.
To add a data source from this screen you can use one of:
- Add New Data Sources
- Add Your First Data Source
2. Start the Add New Data Source Flow
Click the Add New Data Sources button at the top right.
If you are on the empty list screen, the Add Your First Data Source button in the middle starts the same flow.
3. Select the REST API Data Source Type
In the screen that opens, data source types are listed under Select Your Data Source Type.
To add REST API:
- Go to the Web Services & Files section.
- Pick the RestAPI card.
- Click Next at the top right.
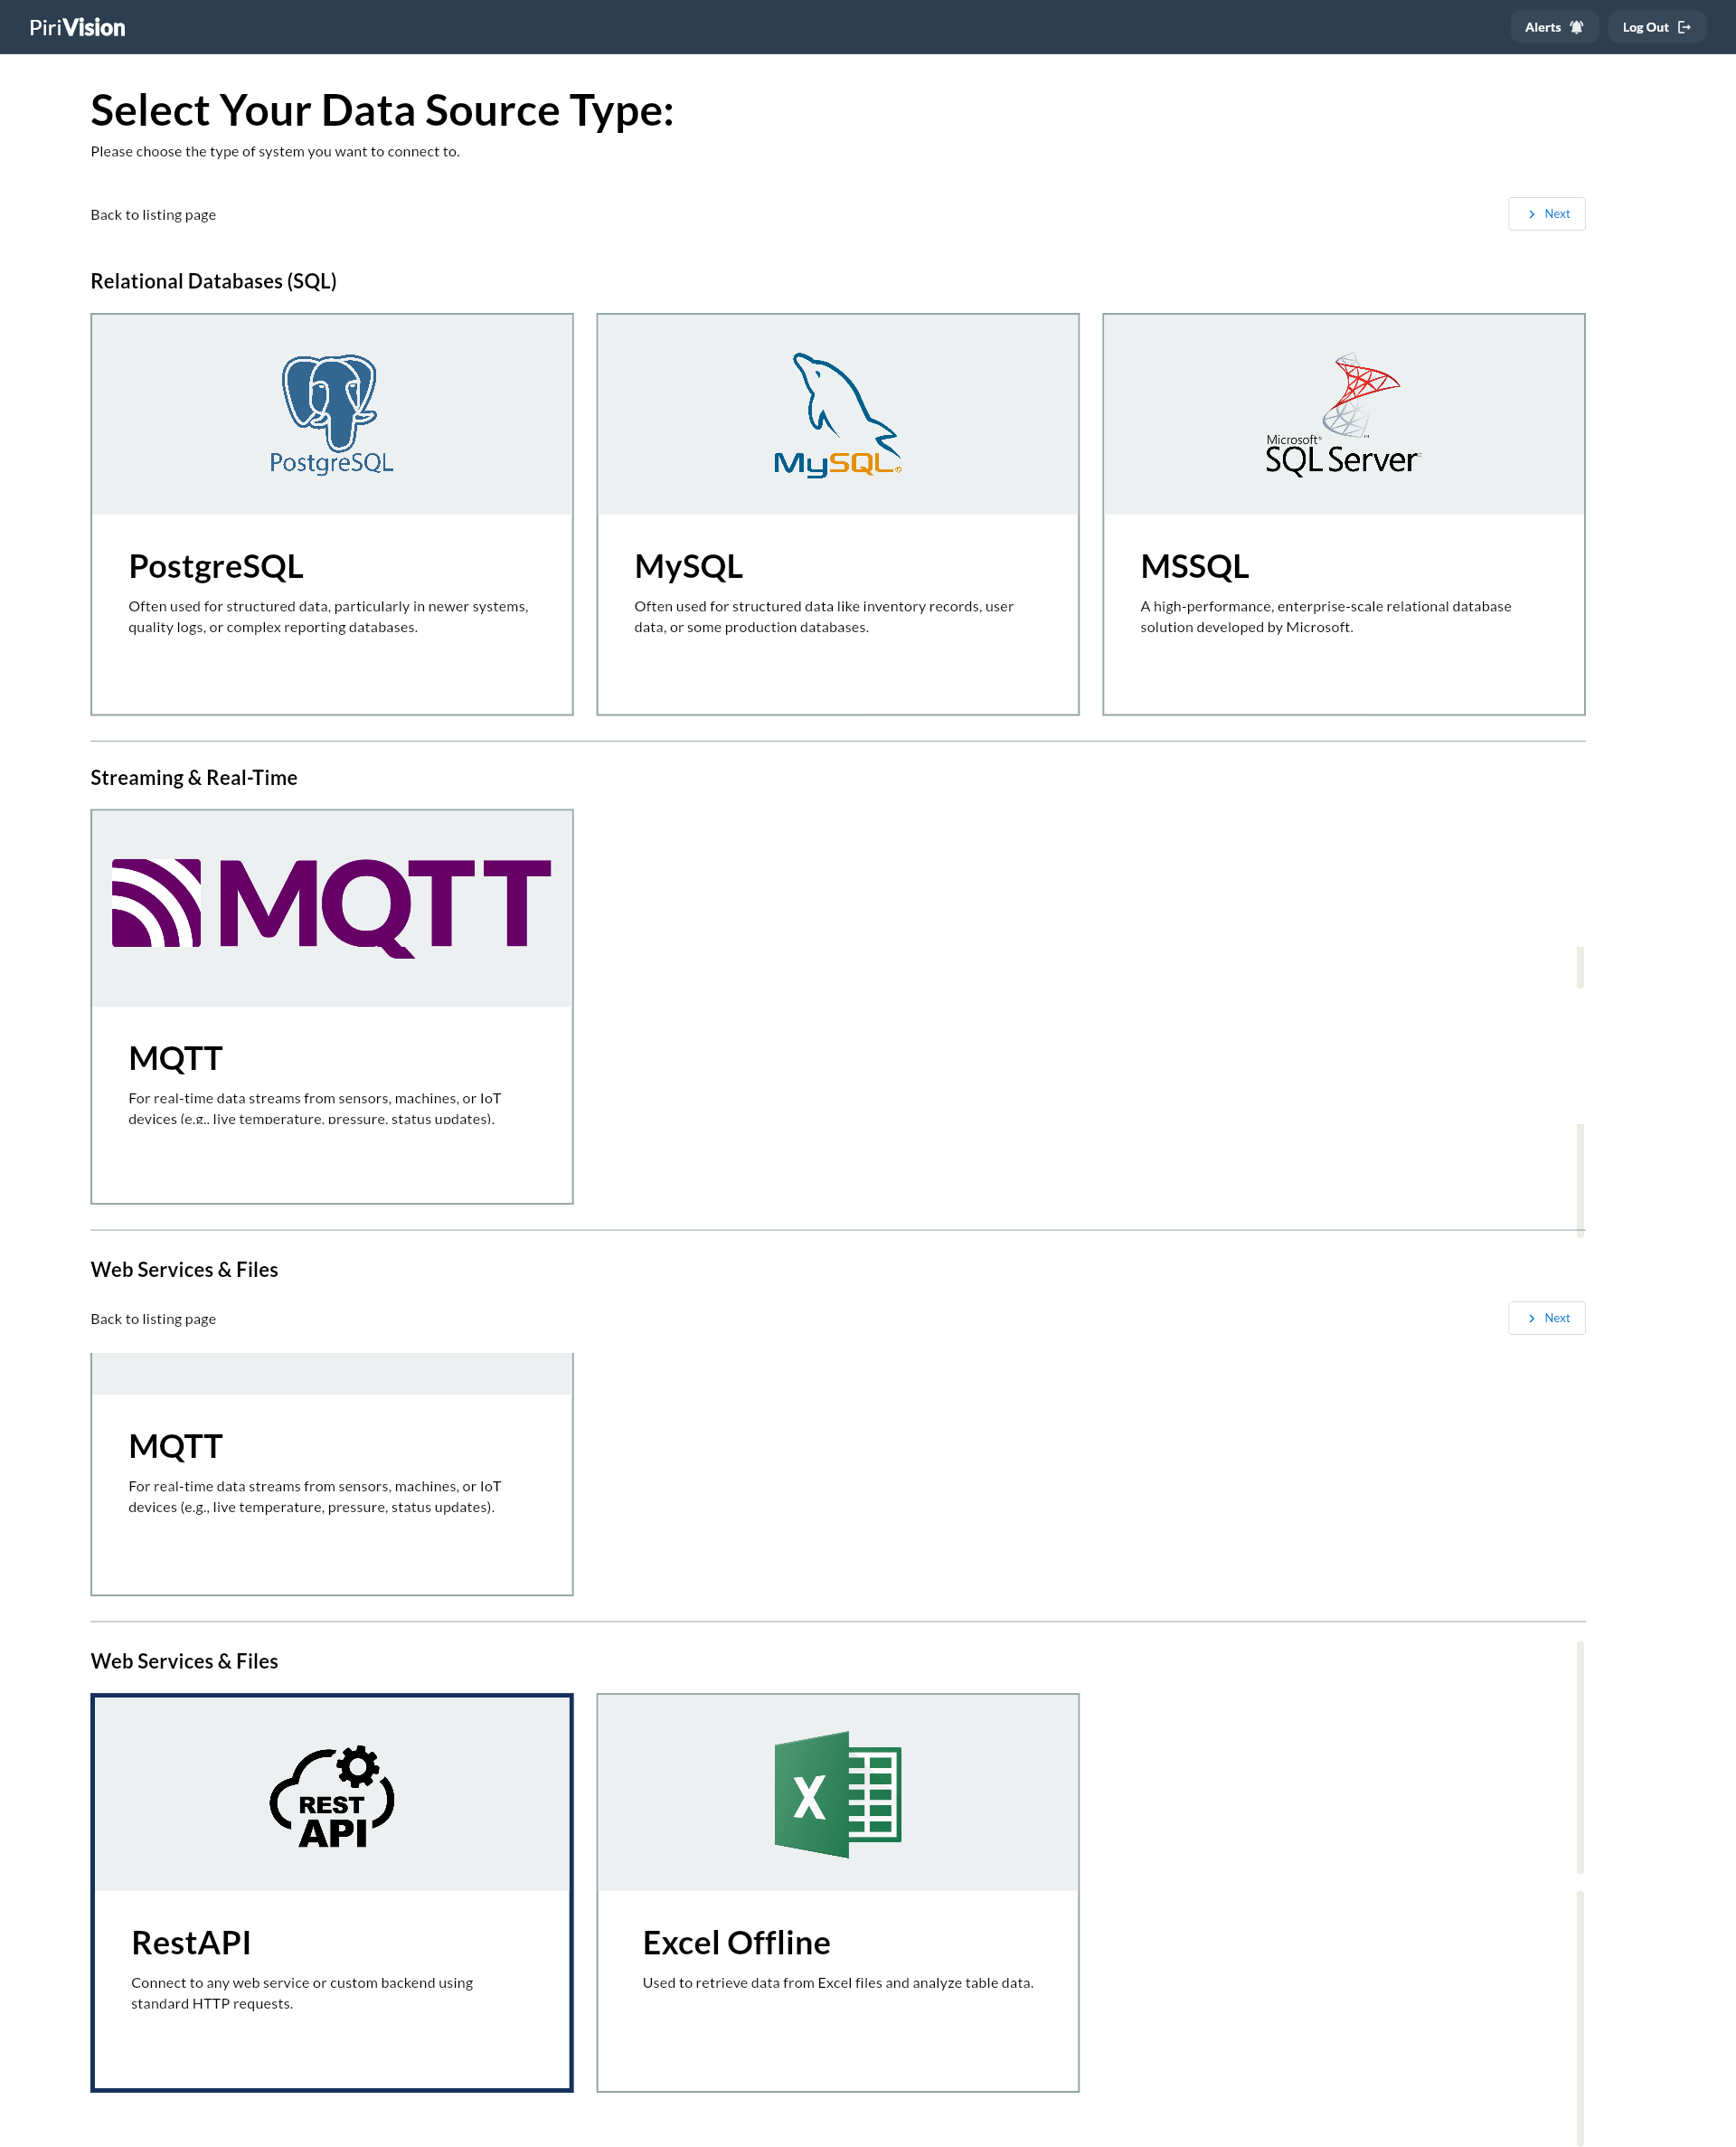
Info
The RestAPI option is used for accessing web services in Pirivision. For Excel files use Excel Offline; for real-time IoT streams pick MQTT.
4. Fill in the REST API Form
After RestAPI is selected, the Add a New RestAPI Data Source screen opens.
The form consists of four main sections:
- Display Info
- Essential Connection
- Client Options
- Location
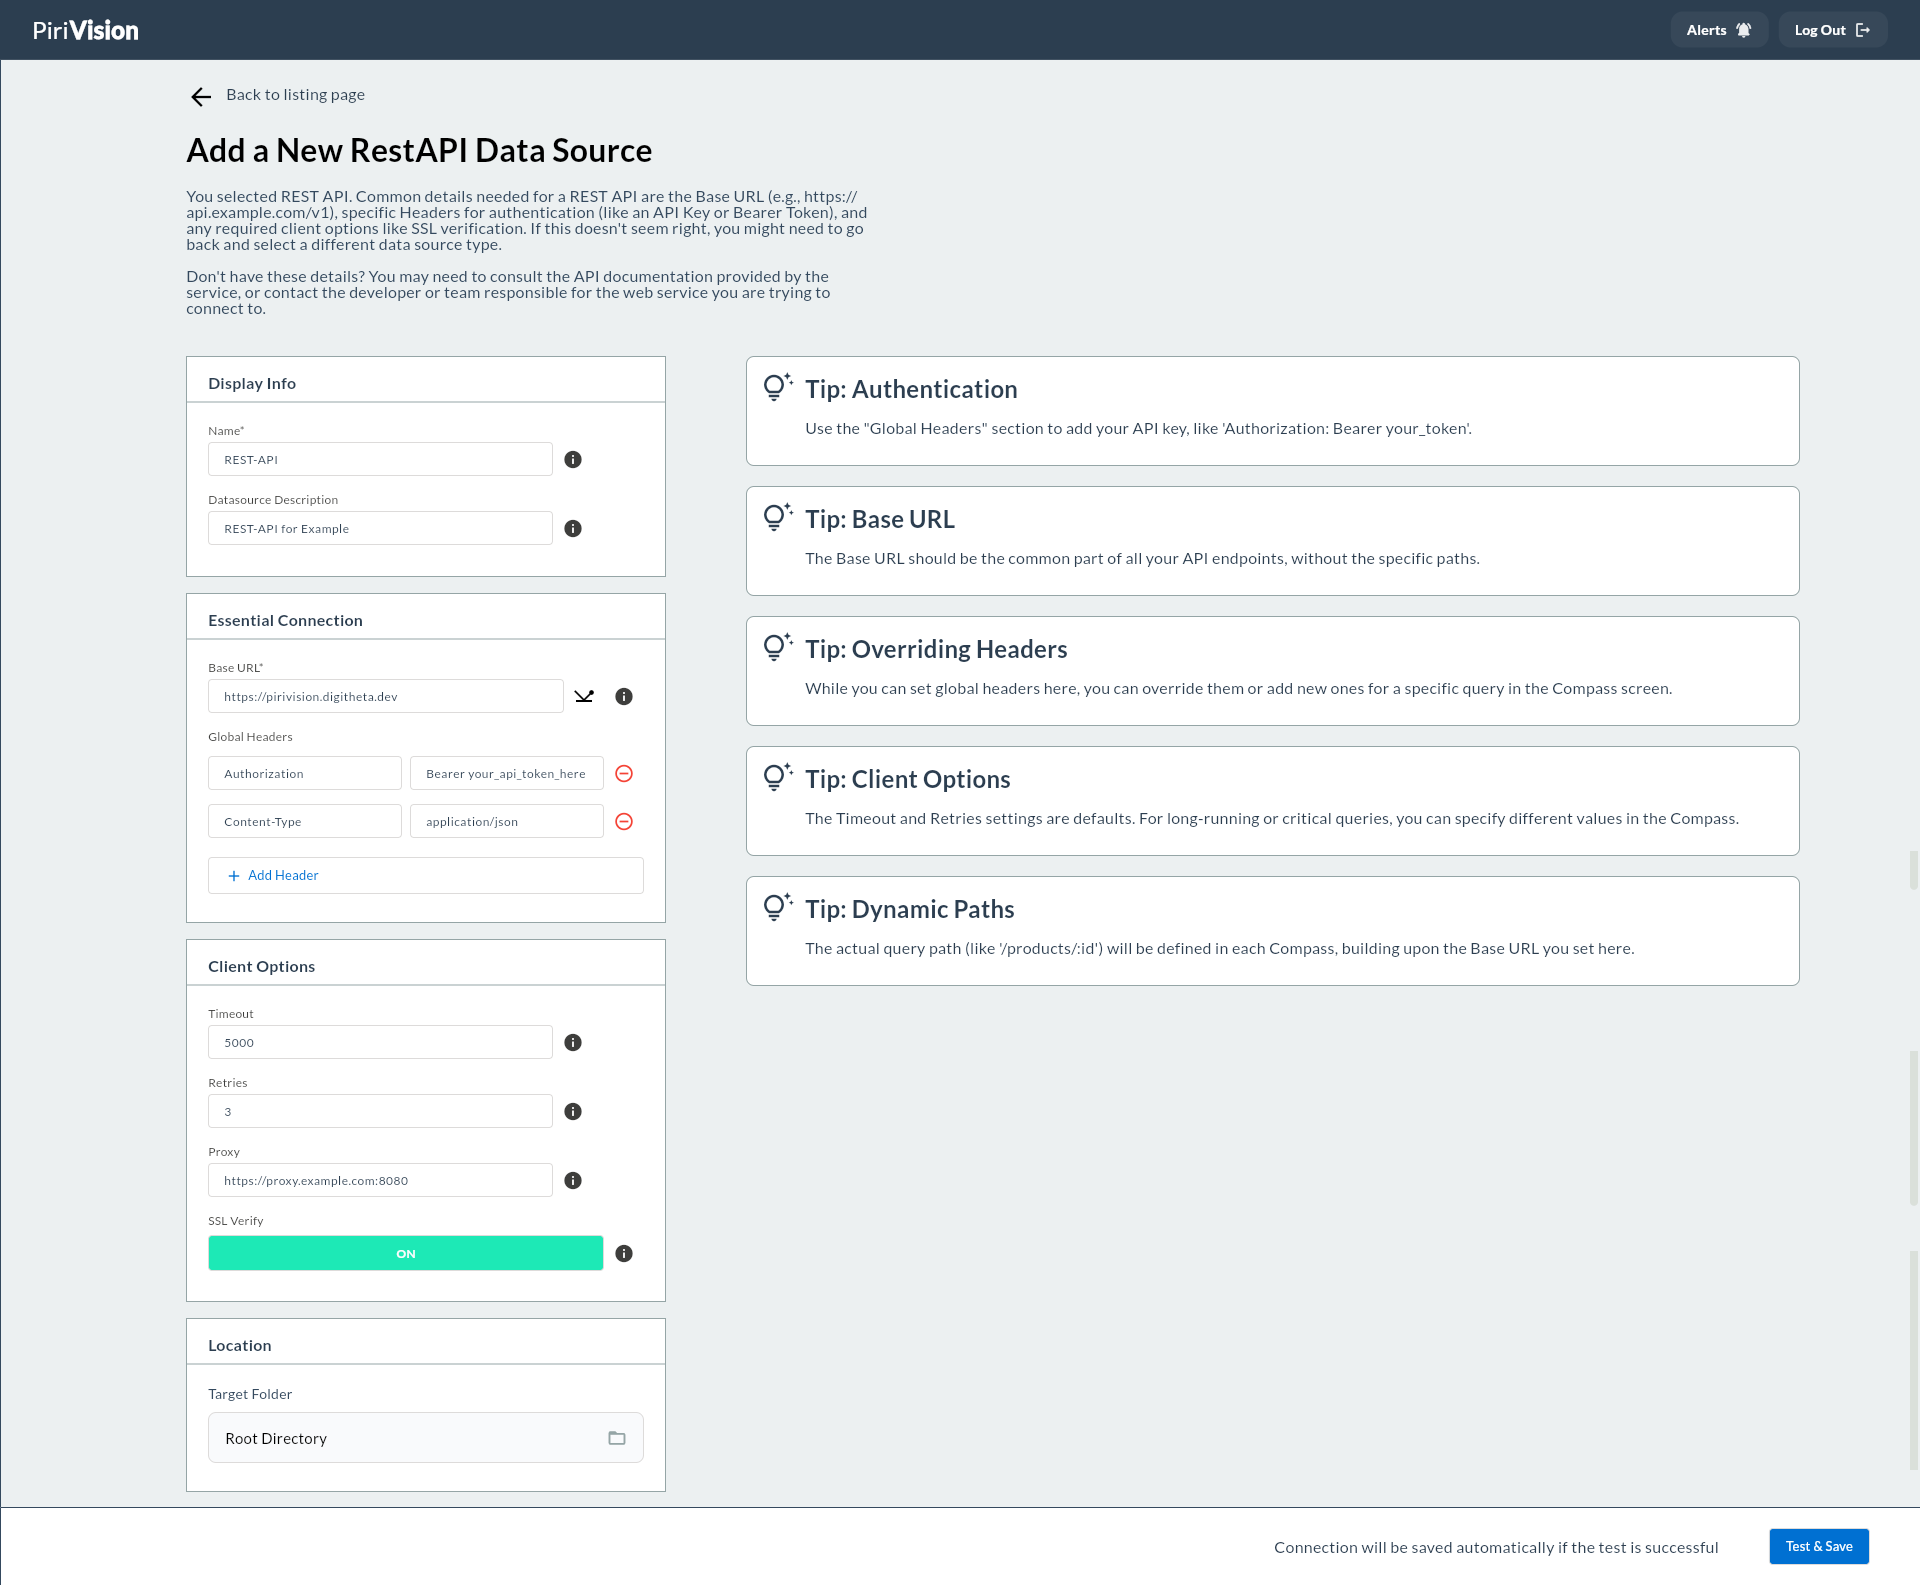
5. Display Info
Display Info determines how the data source appears in the Pirivision UI.
| Field | Required | Description | Default | Example |
|---|---|---|---|---|
| Name | Yes | The name used to identify the data source within Pirivision. | — | REST-API |
| Description | No | A short note explaining what the data source is for. | — | REST-API for Example |
Name
Used to identify this data source on panels and lists.
Good examples:
Description
An optional field that explains what this connection is for.
Example:
6. Essential Connection
Essential Connection contains the basic configuration required to connect to the REST API service.
| Field | Required | Description | Default | Example |
|---|---|---|---|---|
| Base URL | Yes | Common base address for all API requests. | — | https://pirivision.digitheta.dev |
| Global Headers | No | Headers automatically added to every request (key-value pairs). | — | Authorization: Bearer <token> |
Base URL
The starting point for all Compass queries. Specific API paths (such as /api/v1/orders) are specified in the query definition.
Examples:
Warning
Base URL must not contain a path. Correct: https://api.example.com — Wrong: https://api.example.com/v1/data.
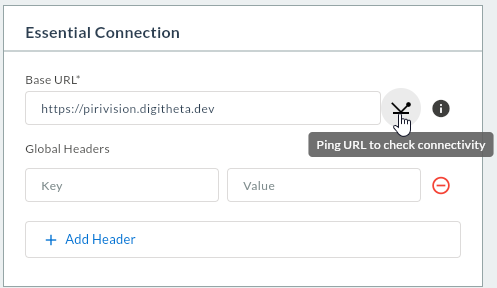
Ping URL — Connectivity Test
The Ping icon to the right of the Base URL field performs a connectivity check against the REST API server before you save the form. The same check runs automatically inside Test & Save; the Ping button exists to give you fast feedback while you are still filling in the form.
What it does
The Pirivision backend (/restapi endpoint, type=ping_url) sends a connectivity-only request (connectivityOnly=true) to the Base URL:
| Aspect | Behavior |
|---|---|
| Target URL | The Base URL exactly as typed in the form |
| Headers | The currently entered Global Headers rows (empty keys are dropped) |
| Method | GET — body is not parsed; only TCP/TLS handshake and HTTP status are validated |
| SSL | Honors the SSL Verify toggle in the form (OFF → accepts self-signed) |
| Timeout | Uses the Timeout value from the form (default 5000 ms) |
| Proxy | Routed through the Proxy field if filled |
| Auth | Headers like Authorization or X-API-Key are sent if present |
Result interpretation
| Feedback | Meaning | Action |
|---|---|---|
🟢 Connection successful! |
Server replied (2xx or 3xx/4xx) | Connection works — you can save |
🟠 Connection successful! but unexpected response |
A reverse proxy or login page may have answered | Confirm the URL is the API root (/api/... is set later in Compass) |
🔴 Connection refused |
Port is closed or service is down | Check service status, port and firewall |
🔴 i/o timeout |
No network reachability or slow upstream | Increase Timeout; verify VPN / DNS |
🔴 x509: certificate signed by unknown authority |
Self-signed cert with SSL Verify ON |
Switch SSL Verify to OFF or trust the cert system-wide |
🔴 401 / 403 returned |
URL is reachable but auth failed | Add or fix Authorization in Global Headers |
🔴 404 returned |
Base URL probably contains a path | Remove the path; /api/... belongs in Compass queries |
Successful ping = server reachable
Pirivision treats non-2xx responses as "successful" for connectivity purposes — the goal is reachability (host + port + TLS). Auth errors (401/403) may still show "successful" here; real API calls happen in Compass with the correct endpoint and credentials.
When to click manually vs. automatically
| Scenario | Behavior |
|---|---|
| Base URL is empty when you click Ping | Warning: Fill in the Base URL field |
| Multiple rapid clicks on Ping | Second click is ignored (isPinging guard) — wait for the result |
| Click Test & Save | The same ping runs first; on success the record is saved, on failure save is aborted |
| You only want to save without testing | Not possible — Test & Save always runs the ping first; Pirivision never stores a REST data source whose connectivity check failed |
When Ping is the safer first step
For services with a long cold-start (lambda-style APIs), Test & Save can time out on the first click. Use Ping first to warm the cache and resolve DNS; then click Test & Save.
Global Headers
HTTP headers automatically added to every Compass query. Each row is a key-value pair.
Common usage examples:
| Key | Value Example | Description |
|---|---|---|
Authorization |
Bearer eyJhbGci... |
JWT token authentication |
Content-Type |
application/json |
Request body format |
X-API-Key |
abc123def456 |
API key authentication |
Accept |
application/json |
Response format preference |
To add a new header click the + Add Header button.
Scenario Examples
Scenario 1 — JWT Bearer Token authentication
Used with token-based APIs such as ERP or MES systems. The token is typically obtained from a dedicated auth endpoint and is valid until it expires.
| Key | Value |
|---|---|
Authorization |
Bearer eyJhbGciOiJIUzI1NiIsInR5cCI6IkpXVCJ9.eyJ1c2VySWQiOiI0MiJ9.abc123 |
Scenario 2 — API Key authentication
Used with services that rely on a static key (weather APIs, cloud platforms, etc.).
| Key | Value |
|---|---|
X-API-Key |
sk-prod-abc123def456ghi789 |
Scenario 3 — Content type and accept headers
Tells the server that the request body is JSON and that a JSON response is expected (common for POST requests).
| Key | Value |
|---|---|
Content-Type |
application/json |
Accept |
application/json |
Scenario 4 — Multi-tenant ERP integration
When the same API endpoint serves multiple plants or companies, the tenant header determines which data is returned.
| Key | Value |
|---|---|
Authorization |
Bearer eyJhbGci... |
X-Tenant-ID |
factory-001 |
Accept |
application/json |
Override Headers
Global Headers set the default headers for this data source. Individual queries in Compass can override these headers or add extra ones.
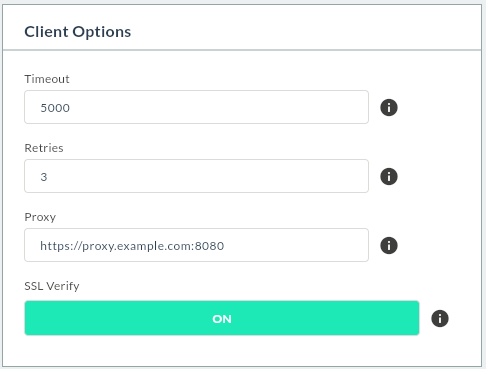
7. Client Options
Client Options contains advanced settings that control the behavior of the REST API client.
| Field | Required | Description | Default | Example |
|---|---|---|---|---|
| Timeout | No | Request timeout (milliseconds) | 5000 |
10000, 30000 |
| Retries | No | Number of retries for failed requests | 3 |
5, 0 |
| Proxy | No | Proxy server address all requests are routed through | — | https://proxy.example.com:8080 |
| SSL Verify | No | Whether to validate the server SSL certificate | OFF |
ON, OFF |
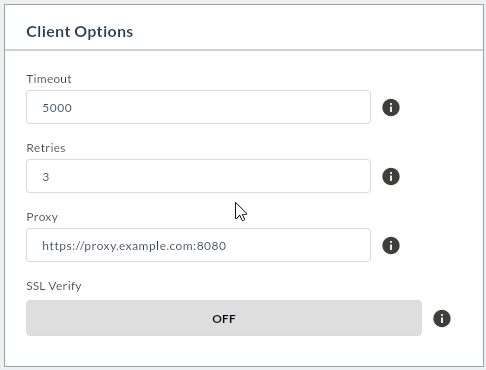
Timeout
How long to wait for the API response. If exceeded, a timeout error is returned.
Default value:
Recommended values:
Retries
Number of times the request is retried in case of network errors or transient service outages.
Default value:
Proxy
Filled in if requests should be routed through a proxy.
Example:
SSL Verify
Determines whether the SSL certificate of the REST API server is verified.
Default value:
SSL Verify
For APIs with trusted SSL certificates in production, ON is recommended. For internal services with self-signed certificates, OFF may be acceptable.
8. Location
Location determines where the created data source is stored in the Pirivision folder structure.
| Field | Description | Default |
|---|---|---|
| Target Folder | Folder where the data source is saved | Root Directory |
When you click the Target Folder field, the folder selection dialog opens:

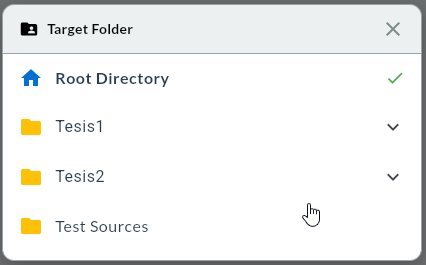
Example folder layout:
PORT/
├── Plant 1/
│   ├── REST APIs/
│   ├── SCADA/
│   └── ERP/
├── Plant 2/
│   └── REST APIs/
└── Test Sources/
9. Save the Connection With Test & Save
After all required fields are filled in, click the Test & Save button at the bottom right.
This works in two stages:
- A ping request is sent to the REST API Base URL and reachability is tested.
- If the test succeeds, the data source is saved automatically.
The screen shows:
Success
If the test is successful, the REST API data source is listed on the Port screen and becomes available for HTTP query creation in Compass.
Failure
If the test fails, check the Base URL, network access, SSL Verify setting, and Global Headers info.
10. Verify the Data Source in the List
After a successful save, returning to the Port main screen shows the created REST API data source in the list.
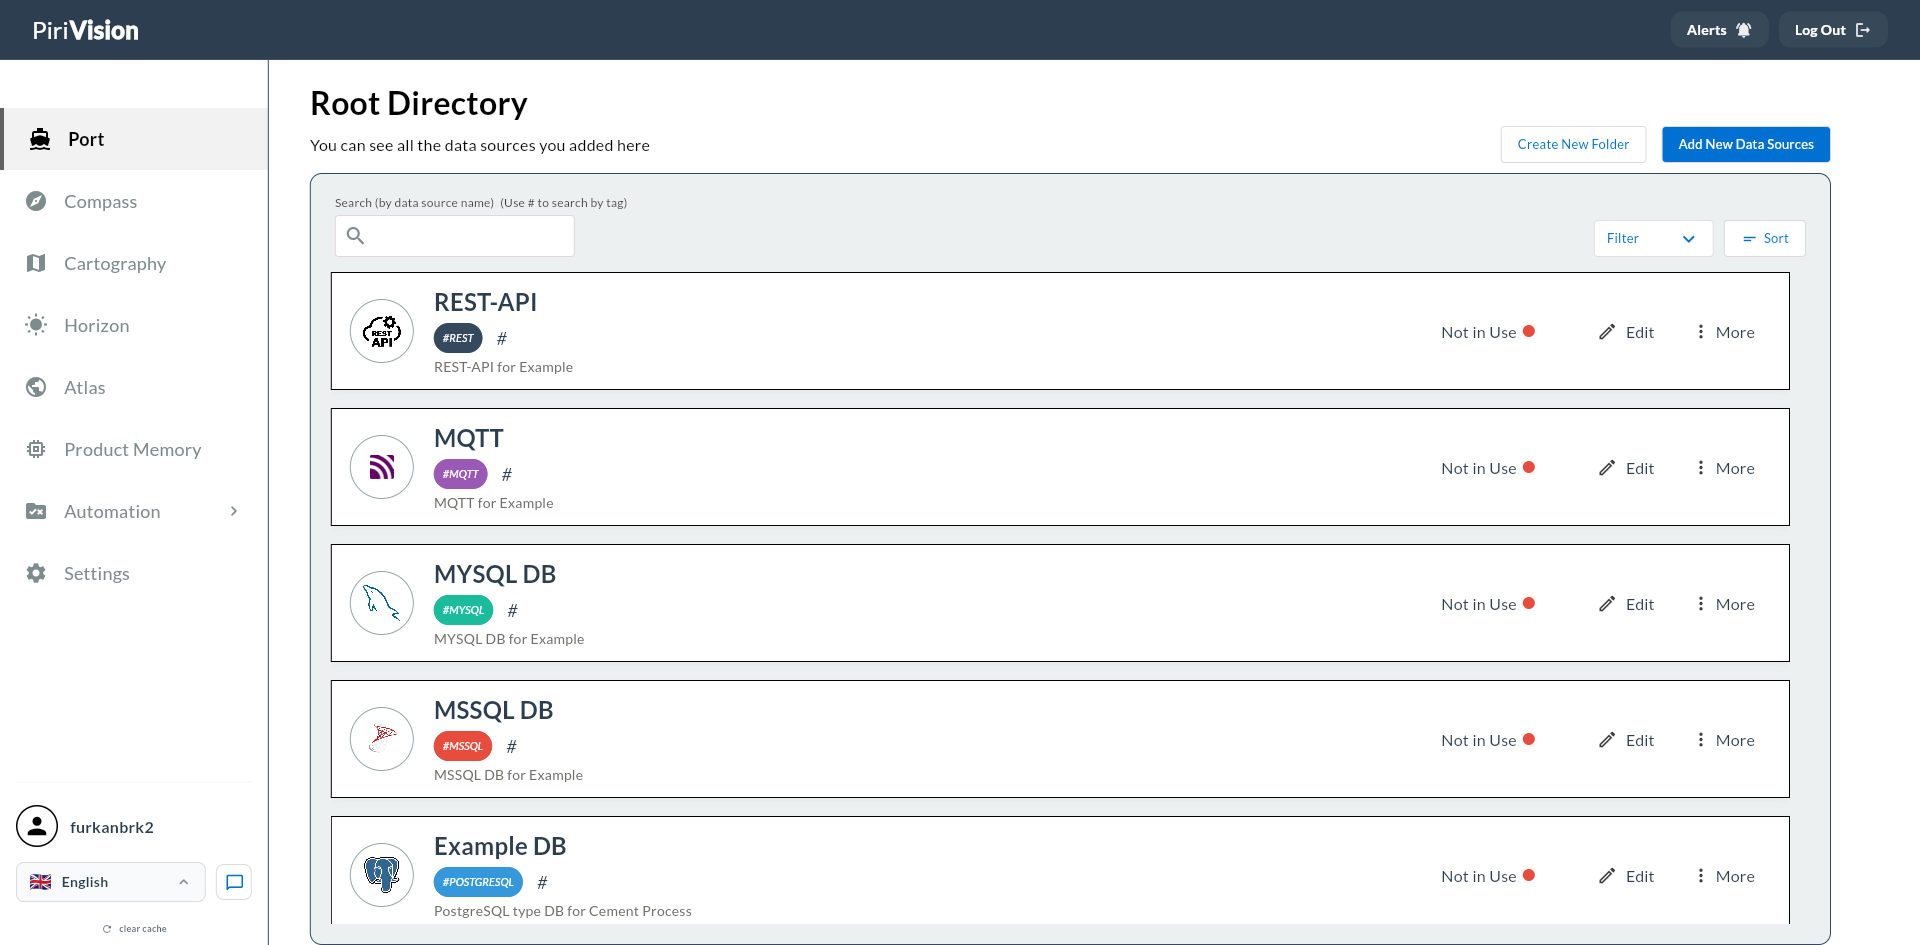
The list card shows the following info and actions:
| Field / Action | Description |
|---|---|
| Data source icon | Indicates this is a REST API data source. |
| Name | Data source name. |
| Description | Description text. |
| Usage status | In Use or Not in Use info. |
| Edit | Updates connection info. |
| More | Opens the additional actions menu. |
| ↳ Move | Moves the data source to a different folder. → Move Data Source |
| ↳ Duplicate | Creates a new copy with the same settings. → Duplicate Data Source |
| ↳ Delete | Removes the data source. → Delete Data Source |
11. Common Errors
| Error / Symptom | Possible Cause | Solution |
|---|---|---|
| Cannot connect | Base URL is wrong or unreachable | Open the URL in a browser to verify reachability. |
Connection refused |
Target service is not running | Check that the API service is up. |
| Timeout error | Network latency or service overloaded | Increase the Timeout value or check the network. |
401 Unauthorized |
Authentication failed | Check the Authorization value in Global Headers. |
403 Forbidden |
Insufficient permissions | Verify that the API token has enough privileges. |
404 Not Found |
Base URL contains a wrong path | Make sure the Base URL does not include a path. |
| SSL certificate error | Self-signed cert or certificate mismatch | Set SSL Verify to OFF or fix the certificate. |
| JSON parse error | API does not respond in JSON format | Verify that the API returns Content-Type: application/json. |
| Cannot connect through proxy | Wrong proxy configuration | Check the proxy URL and port. |
| Will not save | Test failed | The connection is not saved unless the test succeeds. |
12. Next Step
After the REST API data source is created in the Port module, the process continues with Compass, Cartography, Horizon, and Atlas.
flowchart LR
    A["Port<br/>REST API Data Source"] --> B["Compass<br/>HTTP Query"]
    B --> C["Cartography<br/>Chart / KPI"]
    C --> D["Horizon<br/>Page / Board Preparation"]
    D --> E["Atlas<br/>Dashboard View"]
Dynamic Paths
When writing REST API queries in Compass, specific paths can be appended to the Base URL (e.g. /api/v1/orders?status=active). This way multiple queries can be created against different endpoints from a single Base URL data source.
Summary
The REST API data source addition process:
- Open the Port module.
- Click the Add New Data Sources button.
- Select RestAPI as the data source type (Web Services & Files section).
- Fill in the Display Info fields.
- Enter the Base URL and Global Headers in Essential Connection.
- Configure Client Options (Timeout, Retries, Proxy, SSL Verify).
- Choose the Target Folder.
- Use Test & Save to test and save the connection.
- Verify the data source in the Port list.
- Create an HTTP query in the Compass module.